• 源代码地址:go/src/context/context.go at master · golang/go · GitHub
# 功能简介
- 为什么需要:Go 的协程(Goroutine)是一旦启动就很难从外部强行关闭的。
Context的核心作用就是通知协程:“任务取消了,或者时间到了,别干了,赶紧退出。” - 设计核心思想是什么:可以把
Context想象成一棵树:根部发出信号,所有枝叶(协程)都要监听这个信号
# 功能分析
# 0. 接口核心
定义:
type Context interface {

    Deadline() (deadline time.Time, ok bool)  // 用于超时控制

    Done() <-chan struct{}  // 返回一个只读的通道,在select中监听[取消信号]

    Err() error             // 返回取消的原因

    Value(key any) any      // 携带了什么数据,用于链路追踪
}
# 1. emptyCtx 根节点
// 数据结构
type emptyCtx struct{}

// 实现 Context 接口的核心方法(Deadline()、Done()、Err()、Value())
func (emptyCtx) Deadline() (deadline time.Time, ok bool) {
    return
}
func (emptyCtx) Done() <-chan struct{} {
    return nil
}
func (emptyCtx) Err() error {
    return nil
}
func (emptyCtx) Value(key any) any {
    return nil
}


type backgroundCtx struct{ emptyCtx }
func (backgroundCtx) String() string {  // 重写 String()
    return "context.Background"
}

type todoCtx struct{ emptyCtx }
func (todoCtx) String() string {        // 重写 String()
    return "context.TODO"
}


// Background() 实现
func Background() Context {
    return backgroundCtx{}
}

// TODO() 实现
func TODO() Context {
    return todoCtx{}
}-
emptyCtx实现了 Context 接口的核心方法 -
context.Background():作为所有上下文的「根」,用于主函数、初始化、测试,或处理外部请求的顶层上下文 -
context.TODO():当你暂时不确定该用哪个上下文,或函数还未扩展出 Context 参数时的临时占位符 -
Background()和TODO()实际上是一回事:
二者核心实现完全一致,唯一的区别仅在于类型标识和字符串描述。backgroundCtx和todoCtx都嵌入了emptyCtx结构体,而emptyCtx实现了Context接口的所有核心方法(Deadline()、Done()、Err()、Value()),且这些方法的行为完全固定,且没有被重写 两者仅重写了String()方法,用于在打印 / 调试时区分标识
# valueCtx 数据传递
定义:
// 数据结构
type valueCtx struct {
    Context
    key, val any
}Context: 存储父节点的引用。这使得 Context 形成了一个单向链表。
可以把 valueCtx 记为:“只读的、单向向上的键值对链表节点”
# 3. cancelCtx 取消通知 - 核心
type cancelCtx struct {
Context    // 组合,嵌入父 Context

mu       sync.Mutex            // 锁:保护以下所有字段,确保并发安全
done     atomic.Value          // 存储 chan struct{},即信号通道,懒创建
children map[canceler]struct{} // 重点:记录当前节点下所有的子节点
err      atomic.Value          // 第一次取消时会被赋值,记录取消原因
cause    error                 // 允许开发者自定义更详细的错误原因
}

// canceler定义
type canceler interface {
    cancel(removeFromParent bool, err, cause error)
    Done() <-chan struct{}
}

// cancel()定义
func (c *cancelCtx) cancel(removeFromParent bool, err, cause error) {

    if err == nil {
        panic("context: internal error: missing cancel error")
    }

    if cause == nil {
        cause = err
    }

    c.mu.Lock()

    if c.err.Load() != nil {
        c.mu.Unlock()
        return // already canceled
    }

    // 记录取消状态
    c.err.Store(err)
    c.cause = cause
    d, _ := c.done.Load().(chan struct{})

    // 关闭 Done 通道
    if d == nil {
        c.done.Store(closedchan)
    } else {
        close(d)
    }

    // 递归取消所有子上下文
    for child := range c.children {
        // NOTE: 持有父锁的同时获取子锁
        child.cancel(false, err, cause)
    }

    c.children = nil
    c.mu.Unlock()

    // 从父上下文移除自己
    if removeFromParent {
        removeChild(c.Context, c)
    }
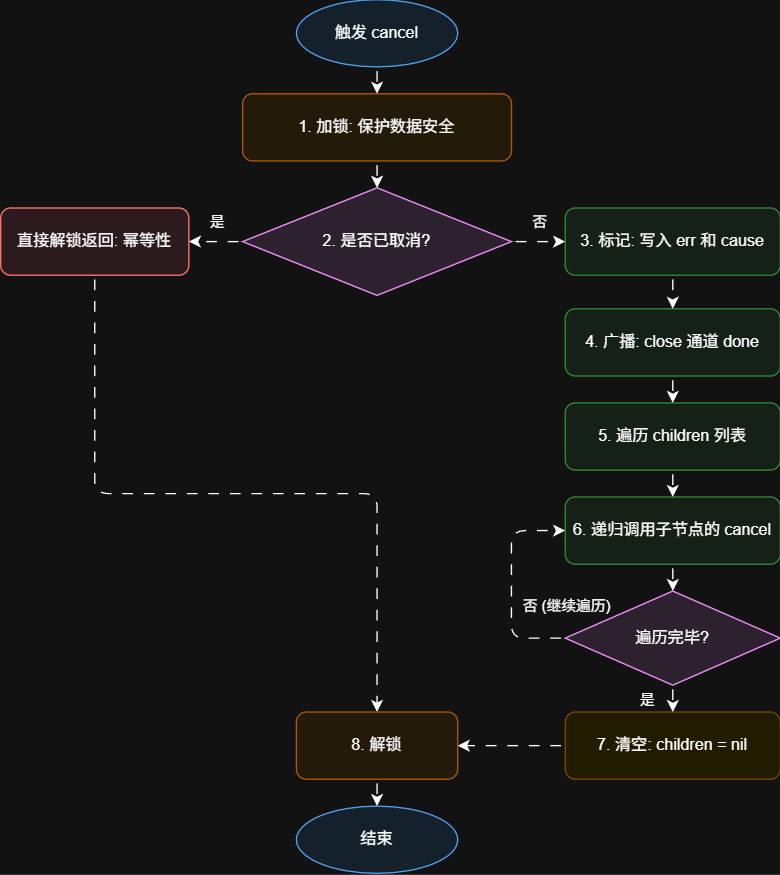
}cancelCtx.children:当父节点被取消时,它会拿着这份名单,挨个通知所有子协程停止工作。cancelCtx.mu:并发保护。由于 Context 会在多个协程中被引用,如果一个协程在读children,另一个协程在往children里加孩子,就会崩。所以mu这把锁至关重要。ctx.cancel():这是信号传递的“导火索”。- 判定状态:如果
c.err.Load() != nil说明已经被取消过了,直接返回 - 触发关闭:通过
close(c.done)关闭通道。此时,所有监听<-ctx.Done()的协程都会瞬间收到通知 - 递归通知:遍历
children这个 Map,对每一个子节点调用child.cancel(...) - 清理现场:将
children置为nil,释放内存。
- 判定状态:如果
# Q1 为什么 cancelCtx.done 字段要使用 atomic.Value 而不是直接用 chan?
好处:
- 懒初始化:只有调用
Done()的 goroutine 才创建通道 - 无锁快速路径:大多数情况直接
Load()返回(原子操作比锁快 5 倍) - 省内存:短生命周期的 context 不会浪费通道
❌ 直接用 chan(不用 atomic.Value)
type cancelCtx struct {
    done chan struct{}  // 直接定义
}

func (c *cancelCtx) Done() <-chan struct{} {
    return c.done  // 每次都直接读取,但需要加锁保护初始化
}
问题:
- 必须在初始化时就创建通道,浪费内存(很多context从不被监听)
- 每次读取需要加锁检查,性能差
✅ 用 atomic.Value(现在的实现)
type cancelCtx struct {
    done atomic.Value  // 原子值,初始为 nil
}

func (c *cancelCtx) Done() <-chan struct{} {
    d := c.done.Load()        // 第一次:无锁读取(快速路径)
    if d != nil {
        return d.(chan struct{})
    }
    c.mu.Lock()               // 第二次:只在需要时才加锁
    defer c.mu.Unlock()
    d = c.done.Load()         // 再读一次,确保线程安全
    if d == nil {
        d = make(chan struct{})
        c.done.Store(d)
    }
    return d.(chan struct{})
}
# 第一次读取:Fast Path(快速路径)
d := c.done.Load()
if d != nil { return d.(chan struct{}) }- 目的:绝大多数情况下,
Done()会被重复调用成千上万次。如果每次都加锁,性能会显著下降。 - 原理:利用原子读取(Atomic Load)。如果 Channel 已经创建好了,直接返回,不涉及任何锁操作。
# 加锁:准备“初始化”
c.mu.Lock()
defer c.mu.Unlock()目的:如果第一次读取发现是 nil,说明可能需要创建 Channel。加锁是为了保证只有一个协程能执行 make(chan struct{})。
# 第二次读取:关键的“再确认”
d = c.done.Load() // 为什么还要再读一次?
if d == nil
- 核心原因:在“第一次读取”和“加锁成功”之间存在一个时间差。
- 结论:第二次读取是为了确认在你排队等锁的这段时间里,是不是已经有“前辈”把活儿干完了。
# 类比
假设场景:你是协程 A,你朋友是协程 B。你们同时发现机器没开,都想去启动它。
源码步骤
餐厅取号类比
核心目的
d := c.done.Load()
进门前: 远远看一眼取号机亮没亮。
高效率:如果机器亮着(已有 Channel),直接拿号走人,不浪费时间排队。
c.mu.Lock()
进门时: 发现机器没亮,由于一次只能进一个人,你开始排队等保安放行。
防冲突:确保同一时刻只有一个“修理工”在操作机器。
d = c.done.Load()
进门后: 轮到你站在机器前了,先别急着按开关,再看一眼屏幕。
双重保险:防止在你排队时,你朋友(协程 B)已经从别的门进去把机器修好溜了。
make(chan...)
确认黑屏: 看到屏幕确实还黑着,按下启动键。
真正执行:只初始化一次,避免重复创建导致数据覆盖。
# Q2 如果子节点非常多(上万个),递归取消会不会导致性能问题?
Background
  ├─ ctx1 (WithCancel)
  ├─ ctx2 (WithCancel)
  ├─ ctx3 (WithCancel)
  └─ ... 10000 个子 ...
取消 Background 时:
-
循环 10000 次,每次调用 cancel()
-
虽然不会栈溢出,但会长时间持有锁 ⚠️
-
为什么还是这样设计?
- 语义要求:必须同步保证所有子都被取消
- 资源清理:定时器等资源需要立即释放
- 实际场景:HTTP 服务器的请求链通常只有 5-10 层深
- 权衡 :异步递归会引入复杂性和竞态条件
建议用法
// ✅ 正确:扁平结构
ctx := context.Background()
ctx1, cancel1 := context.WithCancel(ctx)
ctx2, cancel2 := context.WithCancel(ctx)  // 都从 Background 派生
ctx3, cancel3 := context.WithCancel(ctx)
// 取消任何一个都很快

// ❌ 避免:深层链式嵌套
ctx := context.Background()
for i := 0; i < 10000; i++ {
    ctx, _ = context.WithCancel(ctx)  // 链式嵌套很深
}
# timerCtx 超时控制
定义:
// timerCtx 包含一个计时器timer和一个截止时间deadline。
// 它嵌入了一个 cancelCtx 以实现 Done 和 Err 方法。
// 它通过停止其计时器,然后委托给 cancelCtx.cancel 来实现取消操作。
type timerCtx struct {
    cancelCtx

    timer *time.Timer // Under cancelCtx.mu.
    deadline time.Time
}


func (c *timerCtx) cancel(removeFromParent bool, err, cause error) {
c.cancelCtx.cancel(false, err, cause)
if removeFromParent {
// Remove this timerCtx from its parent cancelCtx's children.
removeChild(c.cancelCtx.Context, c)
}
c.mu.Lock()
if c.timer != nil {
c.timer.Stop()
c.timer = nil
}
c.mu.Unlock()
}
# Q3 时间到了,它是如何自动调用 cancel() 的
当调用 context.WithTimeout 或WithDeadline 时,源码里发生了以下关键动作:
// 关键逻辑:设定闹钟
c.timer = time.AfterFunc(dur, func() {
c.cancel(true, DeadlineExceeded, nil) // 闹钟响了,自动调 cancel
})- 为什么要手动调用
cancel()? 虽然timerCtx会在时间到时自动取消,但如果你的任务提前完成了,那个闹钟(Timer)还在后台跑着,直到时间到才会被销毁。 - 源码中的处理: 在
timerCtx.cancel的实现中,会看到一行:
if c.timer != nil {
c.timer.Stop()  // 停掉闹钟,释放资源
c.timer = nil
}
无论是否超时,一定要习惯性地写上 defer cancel()。这是为了提前关闭闹钟,节省系统资源(避免内存泄漏)
# WithCancel 的诞生、 cancel()的连锁反应
# WithCancel 的诞生:绑定与挂载
在 Go 的并发世界里,一旦协程(Goroutine)启动,它是没有办法从外部被强制杀死的。
WithCancel 就像是给这些协程发了一个无线接收机,你一按开关,所有接收机都会收到“停工”指令。
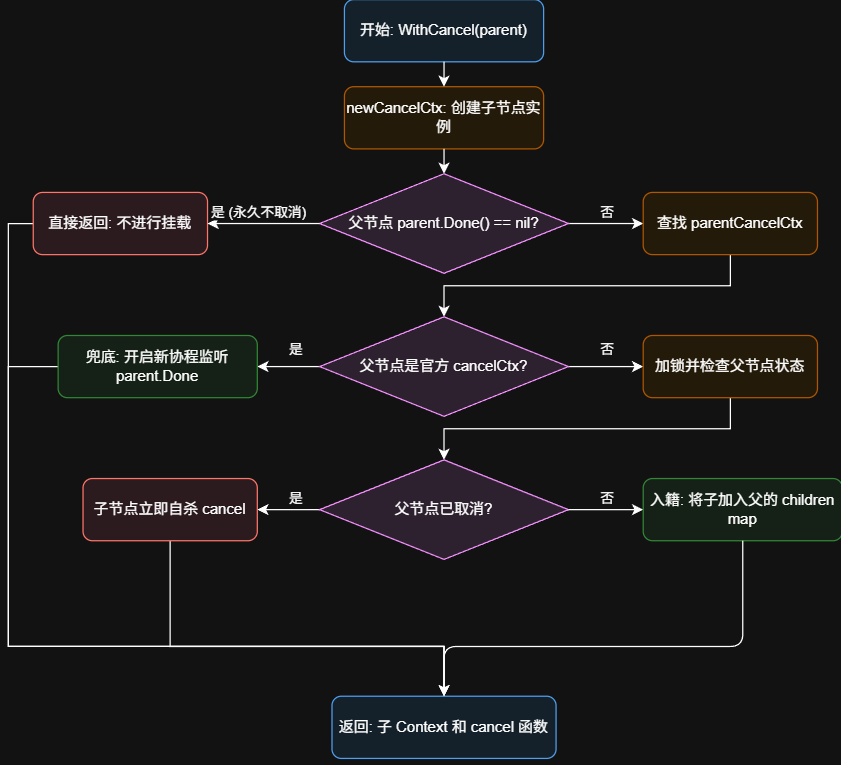
func WithCancel(parent Context) (ctx Context, cancel CancelFunc) {
    c := newCancelCtx(parent)          // 1.创建:把父节点包装进新的 cancelCtx
    propagateCancel(parent, &c)        // 2.挂载:把自己注册到父节点的“名单”里
    return &c, func() { c.cancel(true, Canceled, nil) } // 3.返回:开关交给外部
}- 信号传递过程
# cancel() 的连锁反应:递归取消
当 parent.cancel() 被触发时,它像推倒了第一块多米诺骨牌
func (c *cancelCtx) cancel(removeFromParent bool, err error, cause error) {
    c.mu.Lock()                     // 1. 加锁:准备修改名单
    c.err = err                     // 2. 定性:标记取消原因
    d, _ := c.done.Load().(chan struct{})
    if d == nil {
        c.done.Store(closedchan)    // 3. 广播:如果没有 channel 就直接存个关掉的
    } else {
        close(d)                    // 4. 触发:关闭 channel,通知所有 <-ctx.Done()
    }

    for child := range c.children { // 5. 连锁:遍历名单里的所有孩子
        child.cancel(false, err, cause)// 递归调用孩子的 cancel()
    }
    c.children = nil                // 6. 清理:名单作废
    c.mu.Unlock()
}- 信号传递过程